How to Install and Patch Oracle in One Line
Did you know that at the end of June/beginning of July, Oracle hosted 4 database 19c upgrade webinars? I signed up for them, however the start time of the webinars did not work for me, as it was 3:00 am my time when the webinars started. I was hoping there will be a recording of the webinar, and decided not to attend. And guess what, the database Gods were with me, and the webinars got indeed recorded! Mike Dietrich posted the links on his website.
As I started watching the webinars, I realized there was lot of great information at my fingertips! I actually felt I was in an Oracle instructor led training session! I highly recommend you watch all four of the webinars!
There was one thing that really stuck with me, from the first webinar, and that is: you can do an Oracle 19c installation and patch of the Oracle Home in one line of code. Yes you read that correctly, one line!
Since 18c, the Oracle database installation is an image based installation. This means the installation is simplified, and the time it takes to install Oracle is reduced. You download the software, unzip the file to the Oracle Home directory, then you run the runInstaller (on Unix) to register the Oracle Home with the Oracle inventory!
It is that simple!
It is even easier to install and patch Oracle at the same time. You download the patch as well, and unzip it into the Oracle Home. Then, you run the runInstaller with the option to also apply the patch(es).
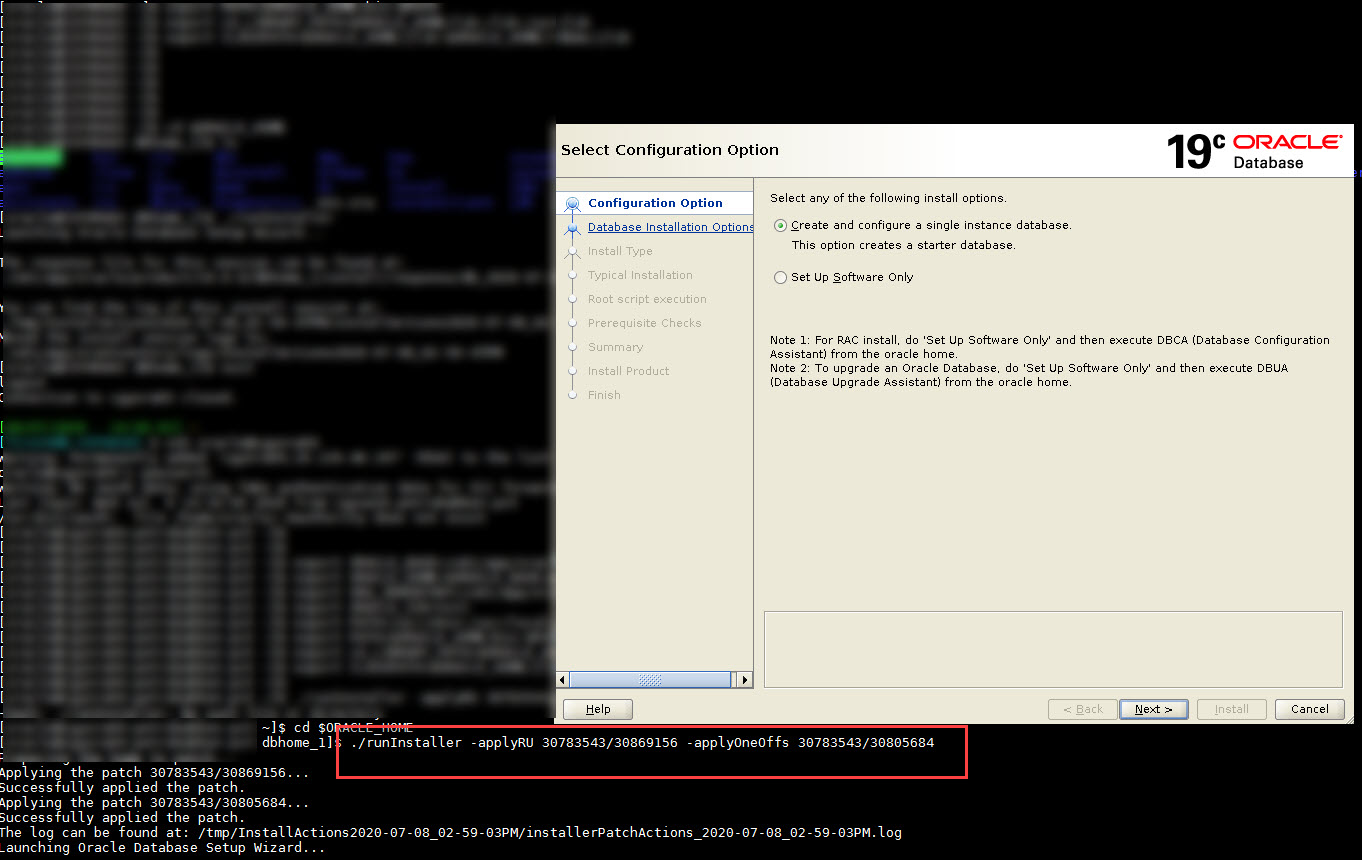
Here is an example on Unix. Let’s install 19c and apply the April 2020 Release Update, RU bundle patch, that consists of two patches, the Database RU and the OJVM patch as well:
I downloaded the April 2020 RU bundle patch 30783543. Unzipped the file into the Oracle Home. This process created the directory 30783543 under the Oracle Home, with 2 sub-directories for the Database RU: 30869156, and one directory for the OJVM patch: 30805684.
When I ran the runInstaller, I used the flag -applyRU to apply the RU patch, and the flag -applyOneOffs to apply the OJVM patch. Below are the step by step instructions:
1) download 19c software and April 2020 patches:
LINUX.X64_193000_db_home.zip and p30783543_190000_Linux-x86-64.zip
2) unzip the software and the patches into the Oracle Home:
$ cd $ORACLE_HOME
$ unzip -oq /home/oracle/LINUX.X64_193000_db_home.zip
$ unzip -oq /home/oracle/p30783543_190000_Linux-x86-64.zip
3) run the installer to install Oracle and the patches at the same time:
./runInstaller -applyRU 30783543/30869156 -applyOneOffs 30783543/30805684
What happens next is very interesting, the patches are applied first, and after the patch installation, the runInstaller is started, to guide you through the rest of the software installation.
Now, if you only wanted to apply the RU, then you would only use the -applyRU flag.

Isn’t this great? DBA’s life is made so much easier!
What do you think about this? Did you watch any of the 19c upgrade webinars? What did you think of them? Let me know in the comments section, I read every comment!
If you enjoyed this article, and would like to learn more about databases, please sign up to my weekly email, and you will receive The Ultimate 3 Step Guide To Find The Root Cause Of The Slow Running SQL!
If you are interested in improving your Oracle Tuning skills, check out my course theultimatesqltuningformula.com

dd
[…] Install Oracle 19c on the server you are going to setup the new database. Install the latest patches as well, at the same time. If you want to know how to do the install and the patching in one line, check it out here. […]