
Install 19c On Windows
In the last post, I have asked you if you wanted to learn 19c with me. The response has been tremendous! Thank you all for responding! Before we start with the learning, I just want to assure everyone that, YES, this will be free, and it will happen here on the blog, or in your inbox! If you have not subscribed yet to my email list, now is the time to do it, so you won’t miss any lessons!
Going back to the previous post, I told you to download 19c, and potentially install it. Have YOU downloaded 19c? Have YOU installed it? If not, go ahead and do it now!
What prevented you from following through, downloading and installing 19c on your laptop?
Don’t postpone it anymore, DO IT NOW!
Here are some of my observations, and take away from the 19c install on my laptop. Starting with 18c, the Oracle database installation is an image based install. And so is 19c. This means the installation is simplified, and the time it takes to install Oracle is reduced. You download the software, unzip the file to the Oracle Home directory (the place you want to install Oracle), then you run the setup.exe to register the Oracle Home with the Oracle Inventory. It’s that simple!
3 Terms that ALL the DBAs should be familiar with, prior to starting the 19c installation:
- Oracle Base
- Oracle Home
- Oracle Inventory
What is the Oracle Base Directory? The Oracle Base directory is the location where the Oracle software is installed, and other configuration files are stored.
You can have multiple installations of the Oracle software under the Oracle Base directory, for the same user. If different operating system users install different Oracle software on the same server, then you must have different Oracle Base directories for each owner. An example here would be the oracle user and the grid user. Example of the Oracle Base directory: D:\app\oracle
What is the Oracle Home Directory? The Oracle Home directory is the location where specific Oracle software binaries are installed. There is only one product installed under the Oracle Home directory. The Oracle Home is located under the Oracle Base. An example of the Oracle Home directory, would be D:\app\oracle\product\19.0.0\dbhome_1.
There could be multiple Oracle Home Directories under the Oracle Base directory.
What is the Oracle Central Inventory Directory? The Oracle Cental Inventory is a central inventory location for all the Oracle software installations on the server. The inventory keeps track of all the Oracle Homes installed on the server. On Windows the default location for the inventory is C:\Program Files\Oracle\Inventory. This location is created with the first installation of Oracle.
Terminology you might not be familiar with, during the 19c installation:
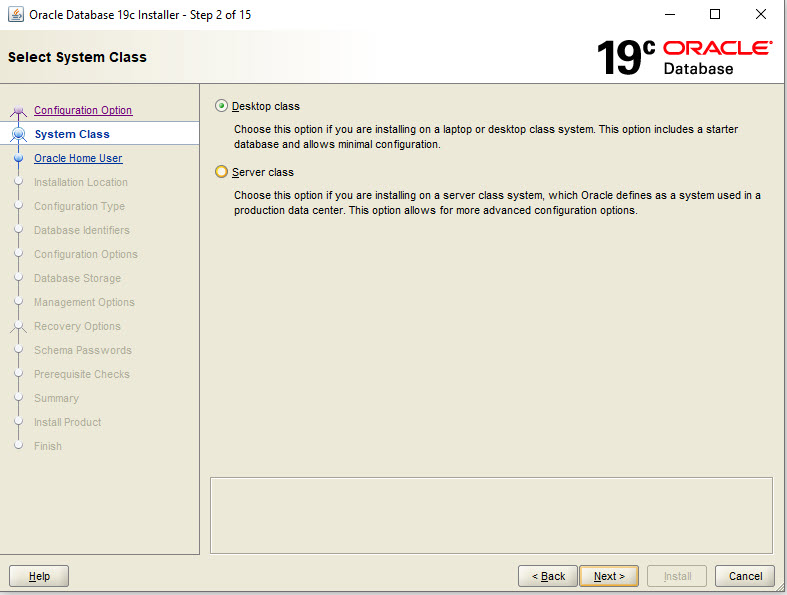
1. Desktop Class Install. This type of installation is recommended to be used for installations on a desktop or laptop. A starter database with the sample schema is automatically created with it. You can make minimal choices during the installation for the database.
2. Server Class install.This type of installation is recommended for servers, for production database installations. If you choose this type of installation, you can pick between Advanced and Typical installation. Since you are a DBA, always go with a Server Class, Advanced installation. You can make many choices during the installation process. Don’t take the easiest route, you want to learn!
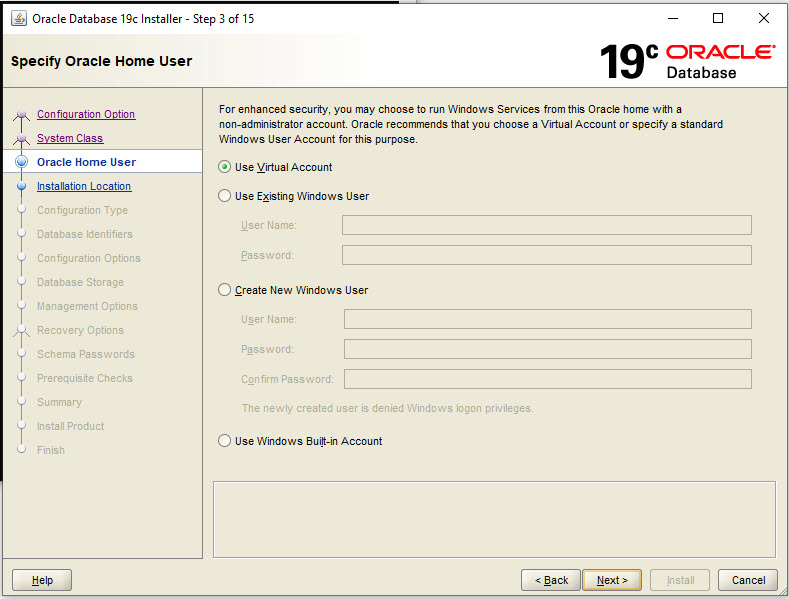
3. Virtual Account. This is a Windows account that requires very little management, with the following features:
- No password management is required for this type of account.
- This account has the ability to access the network with a computer identity in a domain environment.
Pre-requisites for installing 19c on Windows:
In order to install 19c on Windows, your Windows operating system must be 64 bit, you will not be able to install on 32 bit Windows machine.
The following Windows versions are supported:
Windows 8.1 x64 – Pro and Enterprise editions
Windows 10 x64 – Pro, Enterprise, and Education editions
Windows Server 2012 R2 x64 – Standard, Datacenter, Essentials, and Foundation editions
Windows Server 2016 x64 – Standard, Datacenter, and Essentials editions
Windows Server 2019 x64 – Standard, Datacenter, and Essentials editions
Please note that Windows 10 Home Edition is not supported. If you download and extract the files, and try to run the setup.exe, and you notice that nothing happens, this could be due to the fact that you are running Home Edition OS. It happened to me, and I had to setup a VM with Pro edition OS, in order to install 19c!
Server Hardware requirements:
- minimum of 2GB RAM (free memory) recommended
- video adapter: 256 colors
- server display card resolution at least 1024×768
Storage requirements:
For the installation of Oracle 19c, you need 10GB of free space. Depending on the installation type, these are the minimum for each edition:
For Enterprise Edition requires at least 6.5GB of space.
For Standard Edition 2 requires at least 6GB of space.
For Oracle Restart installation, at least 7GB of space.
For detailed installation requirements, always follow Oracle’s documentation.
Both editions Enterprise/Standard Edition 2 come within the same download file. You choose the Edition at the installation time.
Now that you are familiar with the terminologies and the prerequisites, it’s time to get your hands dirty and actually do the work! The whole process requires only 3 steps highlighted below:
Download the software:
Here is the link to download the Oracle 19c software. Please note that this link can change at any time. This link is valid at the time of this writing.
Extract the files
Before you extract the files, you need to determine where the ORACLE HOME directory will be located on your server or laptop. Create that directory and copy the downloaded file there.
Now you can extract the zip file into the ORACLE HOME directory. The Oracle Home directory can look something like: D:\oracle\product\19.0.0\dbhome_1, or any other convention you might use.
Run the setup.exe to complete the installation and register the Oracle home with the Oracle Inventory. You must be connected with admin user account to the server. Go to the Oracle Home directory and run the setup.exe file, by right clicking and choosing Run as Administrator.
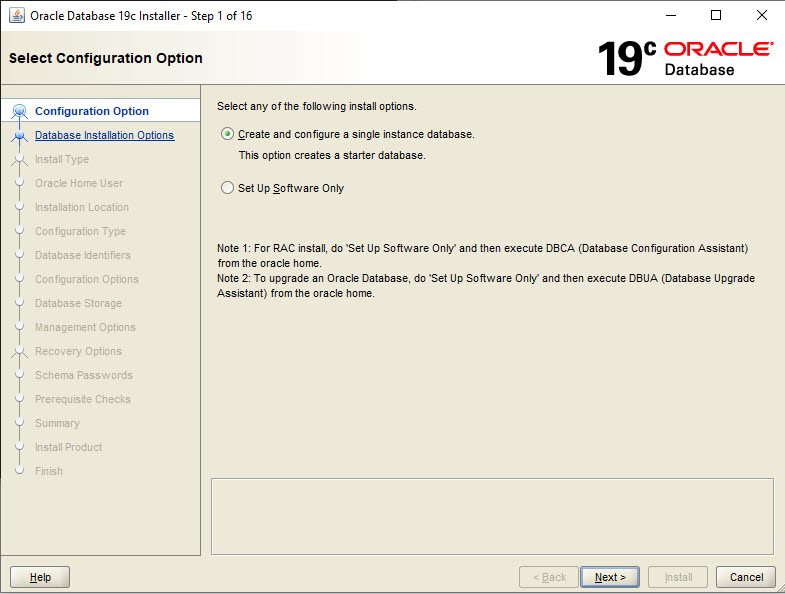
The OUI (Oracle Universal Installer) will start and guide you through the steps of the installation. On the first screen you have the option to create and configure a single instance database, or setup software only.
For the purpose of learning 19c, I recommend you choose the first option, and have a database created as well.
Then you are presented with the option of a Desktop Class installation or a Server Class installation. Again for the purpose of learning, choose Server Class, because you will have more options for the advanced configuration.
The next screen will present you with the option of specifying a user that will run the Windows Services home. For simplicity of this exercise, I picked Virtual User.
Follow along through the rest of the screens, and pick the Oracle Base Directory, the database option as Enterprise Edition, the character set, and the password for the admin accounts. At this point you have the option of creating a non-container database or a container database.
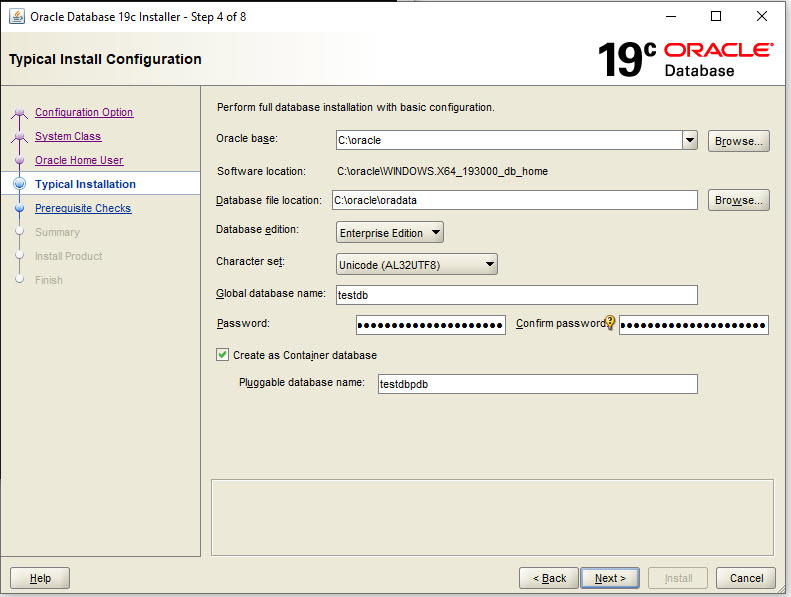
You get to the pre-requisites step checks. If all passes the summary page is presented, and you can click on the Install button. When all is set and done, on the final screen you will be presented with the Enterprise Manager Database Express URL. Make sure you save/bookmark this URL.
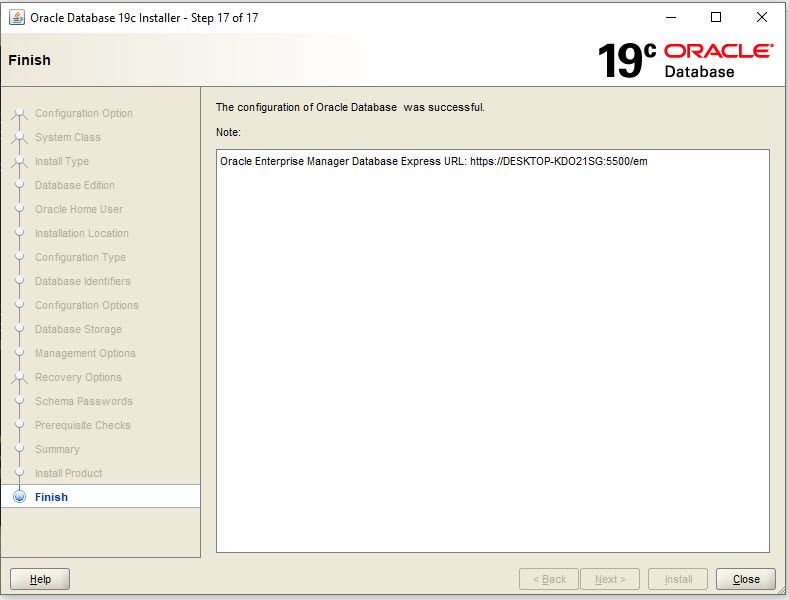
And you are DONE!
Now, here is your homework for this week: go ahead and just do it, just download the software and install it, so you can start learning now! Not tomorrow, not next week, not next month and definitely not next year! NOW is the time to do it!
If you already installed 19c, then go ahead and identify the location of Oracle Base directory, Oracle Home directory and the Oracle Inventory!
If you enjoyed this article, and would like to learn more about databases, please sign up to my weekly email, and you will receive
The Ultimate 3 Step Guide To Find The Root Cause Of The Slow Running SQL!